
版本:vue@2.2.3 文件路径:vue/dist/vue.runtime.esm.js(运行时构建、ES Module版本)
何为 Vue2.0
Vue.js —— The Progressive JavaScript Framework
它是一个渐进式 JavaScript 框架
与其他重量级框架不同的是,Vue 采用自底向上增量开发的设计。 Vue 的核心库只关注视图层,并且非常容易学习,非常容易与其它库或已有项目整合。 另一方面,Vue 完全有能力驱动采用单文件组件和 Vue 生态系统支持的库开发的复杂单页应用。
Vue.js 的目标是通过尽可能简单的 API 实现响应的数据绑定和组合的视图组件
如何上手
简而言之,即命令行以下五步
# 全局安装 vue-cli
$ npm install --global vue-cli
# 创建一个基于 webpack 模板的新项目
$ vue init webpack my-project
$ cd my-project
# 安装依赖,走你
$ npm install
$ npm run dev
像样的vue2.0目录结构
    webpack
      |---build               webpack build 的 各个配置文件
      |---config              不同环境的基础配置
      |---dist                npm run build 生成的output文件
      |---node_modules        引用的npm生态圈的模块
      |---src                 项目的根目录
          |---api             放置各个服务端接口
            |---index.js      index接口
          |---components      模块内部的组件 也就是页面级的组件
            |---header        header组件
              |---header.vue
              |---imgs
                |--head.jpg
          |---store           vuex的store数据模块 各模块划分请参考vuex使用文档
            |---actions.js
            |---getters.js
            |---index.js
            |---mutation-types.js
            |---mutation.js
            |---state.js
          |---App.vue         模块的主vue 包含模板 逻辑 样式
          |---main.html       模块的入口html
          |---main.js         模块的入口js
      |---static              图片等静态资源
      |---.babelrc            babel语法的配置文件
      |---.editorconfig       编辑器的配置文件 -> 规范接入的同学
      |---.eslintignore       配置eslint语法检测忽略的文件
      |---.eslintrc.js        eslint语法检测的配置文件
      |---.gitignore          git提交忽略的文件
      |---package.json        依赖包配置
你可能好奇通过 vue-cli 生成的目录
和上面👆有点区别,
是的,上面目录中添加了store目录状态维护池bus,
同时,将api请求从业务代码分离出来 目录结构更清晰
这里涉及两个知识点 vuex 和 vue-resource
项目的入口
在 /src/main.js 中的
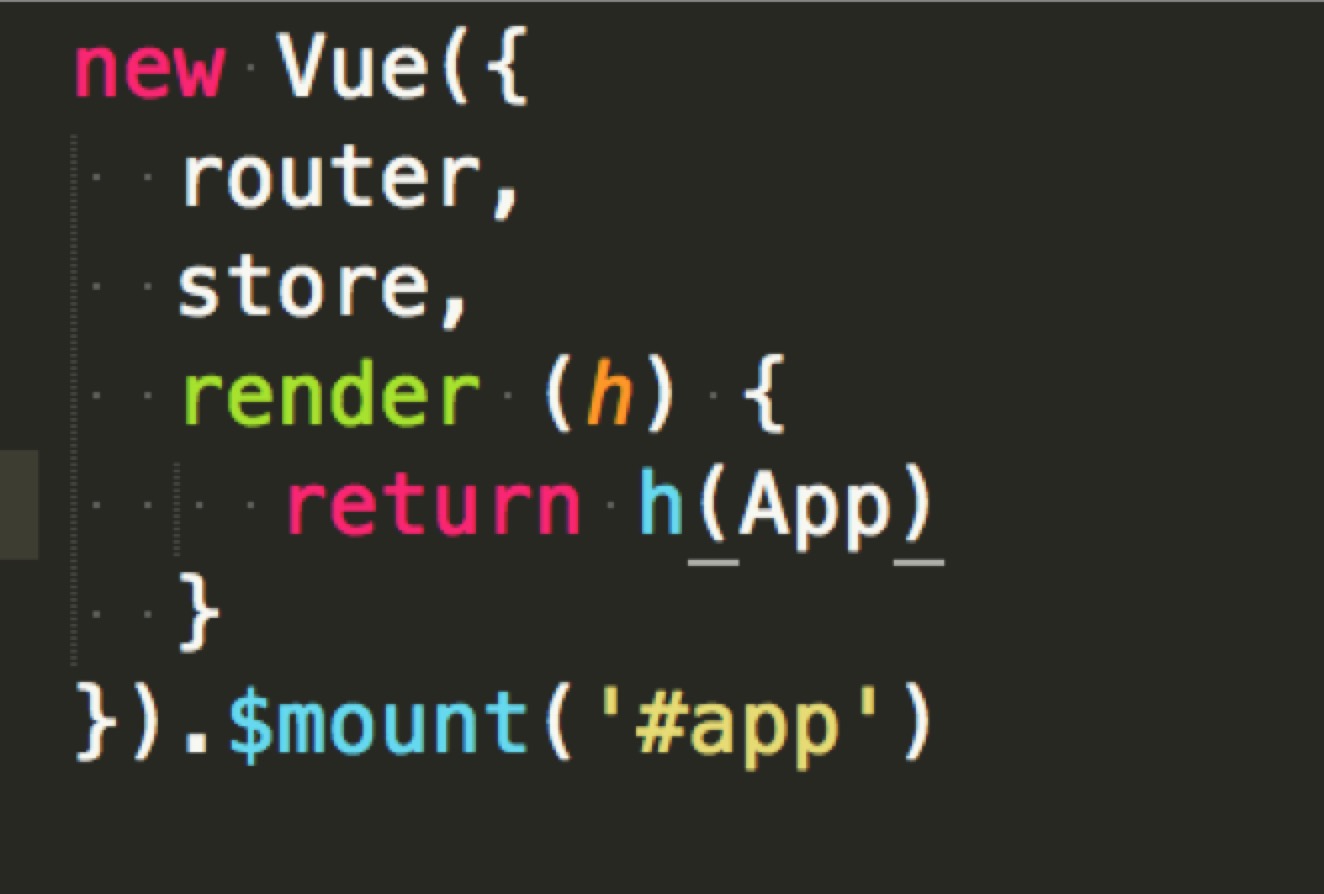
这里,new 实例化 vue 对象,同时传入配置项 router、store、render
并且挂载到 id = 'app' 的 DOM 节点上
注意:render 函数返回的是 h(App) ,App 就是 import 的App.vue组件
一般习惯 h 指 createElement 函数的简写
知识点 好奇这段代码的写法,你就该好好看看 es6语法 了~
进军源码世界
生命周期
分析 vue2.0 的源码,首先从它的生命周期图开始说起

生命周期主要分为4个过程:
create: new Vue时,会先进行create,创建出Vue对象。mount: 根据el, template, render方法等属性,会生成DOM,并添加到对应位置。update: 当数据发生变化后,会重新渲染DOM,并进行替换。destory: 销毁时运行。
接下来的源码解读,也是按上面4个过程循序渐进
入口文件在哪?
在 /node_moudles/vue/src/core/instance/ 目录下
Vue 原型对象及其方法的声明,分散在此目录的多个文件中:
init.js:._init()state.js:.$data .$set() .$delete() .$watch()render.js:._render() …events.js:.$on() .$once() .$off() .$emit()lifecycle.js:._mount() ._update() .$forceUpdate() .$destroy()
create: Vue 原型对象的声明
1.声明 Vue 构造函数,调用 _init 方法,传入 options
注:// … 代表省略的上下文代码
// src/core/instance/index.js
// 1-1 Vue 定义
function Vue (options) {
  // ...
  // 1-2 ./init.js
  this._init(options)
}
// 1-3 ./init.js
initMixin(Vue)
stateMixin(Vue)
eventsMixin(Vue)

// 执行后 定义与生命周期相关的原型方法
lifecycleMixin(Vue)

// 1-4 执行renderMixin 在./render.js中定义 定义了vm._render()渲染VNode方法
// 执行后 定义与渲染相关的原型方法
renderMixin(Vue)

export default Vue
2._init 方法,初始化多个过程,包括初始化 initLifecycle(生命周期)、initEvents(事件监听)、initRender(渲染)、initInjections
initState(状态)、initProvide;最后执行 vm.$mount(vm.$options.el) 挂载 el
知识点
好奇
_init方法的传参,你就该好好看看 静态类型检查工具 flow 了~
简言之,
options?: Object指明 传参options变量类型必须是 对象
// src/core/instance/init.js

Vue.prototype._init = function (options?: Object) {
  // ...
  initLifecycle(vm)
  initEvents(vm)
  // 1-2-4 调用initRender 渲染VNode src/core/instance/render.js
  initRender(vm)
  callHook(vm, 'beforeCreate')
  initInjections(vm) // resolve injections before data/props
  initState(vm)  // 1-2-5 在initState中,会对Props, Data, Computed等属性添加Setter/Getter 在src/core/instance/state.js
  initProvide(vm) // resolve provide after data/props
  callHook(vm, 'created')

  /* istanbul ignore if */
  if (process.env.NODE_ENV !== 'production' && config.performance && mark) {
    vm._name = formatComponentName(vm, false)
    mark('init end')
    measure(`${vm._name} init`, 'init', 'init end')
  }
  if (vm.$options.el) {

    vm.$mount(vm.$options.el)
  }
}
mount: Vue 挂载 el
👇关键点:
vue 有两种构建方式:独立构建和运行构建,区别在于前者包含模板编译器而后者不包含
详细介绍见 vue中文文档
注:模板编译用于编译 Vue 模板字符串成纯 JavaScript 渲染函数
简言之,
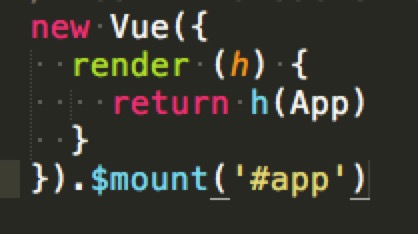
// 在入口 `main.js` 中
// 运行构建只能通过 `render` 选项,加载模板
new Vue({
render (h) {
return h(App)
}
}).$mount('#app')
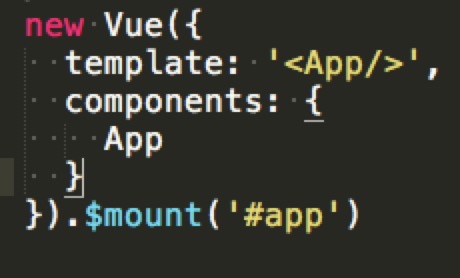
// 而不支持下面👇的 `template` 选项
new Vue({
template: '<App/>',
components: {
App
}
}).$mount('#app')
但即使使用运行时构建,在单文件组件中也依然可以写模板。
独立构建(vue/dist/vue.esm.js)打包了 src/entries/web-runtime-with-compiler.js 和 src/entries/web-runtime.js
运行构建(vue/dist/vue.runtime.esm.js) 只打包了 src/entries/web-runtime.js
下面👇对 Vue.prototype.$mount 的分析基于运行时构建(vue/dist/vue.runtime.esm.js)的源码,也就是在src/entries/web-runtime.js定义
默认 NPM 包导出的是运行时构建。运行时构建比独立构建要轻量30%,只有 17.14 Kb min+gzip大小
注:这里有 vue/dist 目录下各文件说明 https://github.com/vuejs/vue/blob/dev/dist/README.md
| 打包规范 | UMD | CommonJS | ES Module |
|---|---|---|---|
| Full(Runtime + Compiler) | vue.js | vue.common.js | vue.esm.js |
| Runtime-only | vue.runtime.js | vue.runtime.common.js | vue.runtime.esm.js |
| Full (production) | vue.min.js | ||
| Runtime-only (production) | vue.runtime.min.js |
src/entries/web-runtime.js中的Vue.prototype.$mount方法定义
// src/entries/web-runtime.js

Vue.prototype.$mount = function (
  el?: string | Element,
  hydrating?: boolean
): Component {
  // ...
  // 1-2-3-6-2 core/instance/lifecycle.js
  return mountComponent(this, el, hydrating)
}
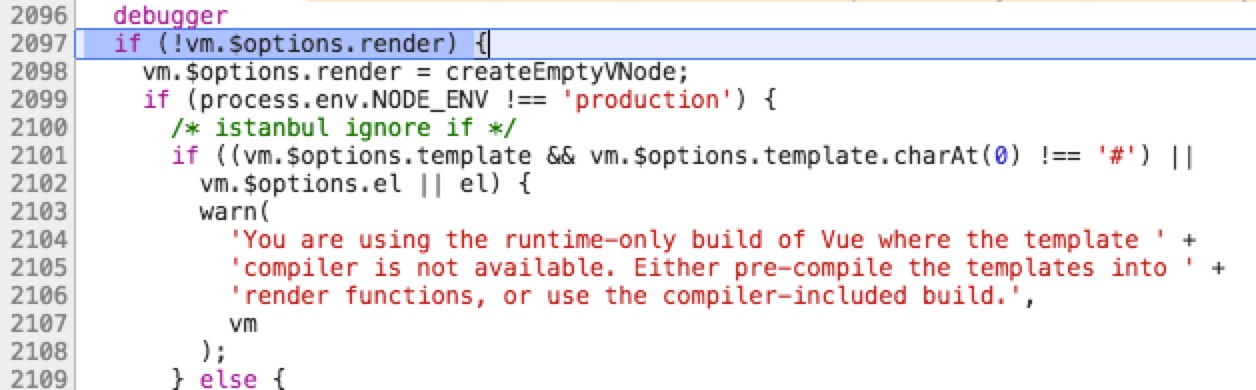
调用 mountComponent 方法,这里的 vm.$options.render 是重点,打个断点 debugger
下表可见不同引用方式,渲染方法 render 不同
| 引用方式 | vm.$options.render | 详细说明 |
|---|---|---|
 |
 |
render 选项,只能使用运行时构建(vue/dist/vue.runtime.esm.js) |
 |
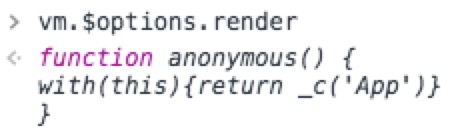 |
支持template 的选项 属于 包含模板编译器的 独立构建(vue/dist/vue.esm.js),其 render 方法的具体实现 参照扩展阅读 |
单组件文件(各种.vue组件) |
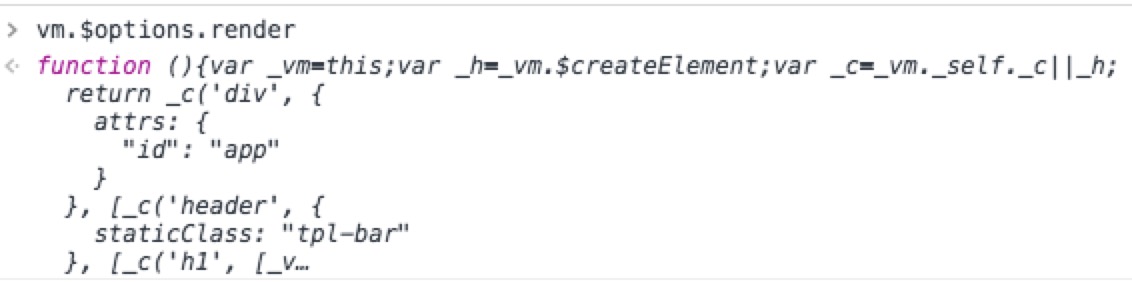 |
单文件组件的模板会在构建时预编译为 render 函数 |
可见,vm.$options.render 方法与调用方式有关
// src/core/instance/lifecycle.js

export function mountComponent (
  vm: Component,
  el: ?Element,
  hydrating?: boolean
): Component {
  vm.$el = el
  if (!vm.$options.render) {
    vm.$options.render = createEmptyVNode;
    // ...
  }
  // 1-2-3-6-2-2 触发 beforeMount 事件
  callHook(vm, 'beforeMount')

  let updateComponent
  /* istanbul ignore if */
  if (process.env.NODE_ENV !== 'production' && config.performance && mark) {
    updateComponent = () => {
      // ...
      vm._update(vnode, hydrating)

    }
  } else {
    // _render 在 ./render.js中定义
    updateComponent = () => {
      // 1-2-3-6-2-5
      vm._update(vm._render(), hydrating)
    }
  }
  // new一个watcher对象 会运行传入的方法vm._update(vm._render(), hydrating)
  vm._watcher = new Watcher(vm, updateComponent, noop)
  hydrating = false

  // manually mounted instance, call mounted on self
  // mounted is called for render-created child components in its inserted hook
  if (vm.$vnode == null) {
    vm._isMounted = true
    callHook(vm, 'mounted')
  }
  return vm
}
上面👆有两个地方需要关注
vm._update(vm._render(), hydrating)更新视图操作new Watcher(vm, updateComponent, noop)这是实现数据双向绑定的关键
接下来,先介绍 vm._render 方法的声明和定义。
render: 渲染
vm._render 返回虚拟DOM
// src/core/instance/render.js

// 1-2-3-6-2-3-1  1-4-3 : VNode限定返回值为VNode对象
Vue.prototype._render = function (): VNode {
  const vm: Component = this
  const {
    render,
    staticRenderFns,
    _parentVnode
  } = vm.$options

  // ...
  vm.$vnode = _parentVnode
  // render self
  let vnode
  try {
    vnode = render.call(vm._renderProxy, vm.$createElement)
  } catch (e) {
    handleError(e, vm, `render function`)
    // ...

  }
  // ...
  // set parent
  vnode.parent = _parentVnode
  // 1-2-3-6-2-3-2 1-4-4
  return vnode
}
由上面表格的第一种引用方式配置 render 选项可知,
这里 vnode = render.call(vm._renderProxy, vm.$createElement) 等价于
执行 vnode = vm.$createElement(App)
接下来看看 createElement 的实现
// src/core/vdom/create-element.js

export function createElement (
  context: Component,
  tag: any,
  data: any,
  children: any,
  normalizationType: any,
  alwaysNormalize: boolean
): VNode {
  if (Array.isArray(data) || isPrimitive(data)) {
    normalizationType = children
    children = data
    data = undefined
  }
  if (alwaysNormalize) normalizationType = ALWAYS_NORMALIZE
  return _createElement(context, tag, data, children, normalizationType)
}

export function _createElement (
  context: Component,
  tag?: string | Class<Component> | Function | Object,
  data?: VNodeData,
  children?: any,
  normalizationType?: number
): VNode {
  if (data && data.__ob__) {
    return createEmptyVNode()
  }
  if (!tag) {
    // in case of component :is set to falsy value
    return createEmptyVNode()
  }
  // support single function children as default scoped slot
  if (Array.isArray(children) &&
      typeof children[0] === 'function') {
    data = data || {}
    data.scopedSlots = { default: children[0] }
    children.length = 0
  }
  if (normalizationType === ALWAYS_NORMALIZE) {
    children = normalizeChildren(children)
  } else if (normalizationType === SIMPLE_NORMALIZE) {
    children = simpleNormalizeChildren(children)
  }
  let vnode, ns
  if (typeof tag === 'string') {
    let Ctor
    ns = config.getTagNamespace(tag)
    if (config.isReservedTag(tag)) {
      // platform built-in elements
      vnode = new VNode(
        config.parsePlatformTagName(tag), data, children,
        undefined, undefined, context
      )
    } else if ((Ctor = resolveAsset(context.$options, 'components', tag))) {
      // component
      vnode = createComponent(Ctor, data, context, children, tag)
    } else {
      // unknown or unlisted namespaced elements
      // check at runtime because it may get assigned a namespace when its
      // parent normalizes children
      vnode = new VNode(
        tag, data, children,
        undefined, undefined, context
      )
    }
  } else {
    // direct component options / constructor
    vnode = createComponent(tag, data, context, children)
  }
  if (vnode) {
    if (ns) applyNS(vnode, ns)
    return vnode
  } else {
    return createEmptyVNode()
  }
}
以上👆是 VNode 的生成方式,有兴趣可阅读 createComponent 方法的实现,此处不展开
update: 更新视图
回到mount挂载时的关注点,vm._update(vm._render(), hydrating)
以vm._render()生成的虚拟DOM为参,更新视图
// src/core/instance/lifecycle.js

// 1-2-3-6-2-6 vm._update原型方法 通过vm._render()拿到vNode后,进行DOM更新。
Vue.prototype._update = function (vnode: VNode, hydrating?: boolean) {
  const vm: Component = this
  if (vm._isMounted) {
    callHook(vm, 'beforeUpdate')
  }
  const prevEl = vm.$el
  const prevVnode = vm._vnode
  const prevActiveInstance = activeInstance
  activeInstance = vm
  vm._vnode = vnode
  // Vue.prototype.__patch__ is injected in entry points
  // based on the rendering backend used.
  // 1-2-3-6-2-7
  if (!prevVnode) {
    // initial render 1-2-3-6-2-8 首次添加
    vm.$el = vm.__patch__(
      vm.$el, vnode, hydrating, false /* removeOnly */,
      vm.$options._parentElm,
      vm.$options._refElm
    )
  } else {
    // updates
    // 1-2-3-6-2-9 在 src/core/vdom/patch.js 定义
    vm.$el = vm.__patch__(prevVnode, vnode) // 数据变化后触发的DOM更新
  }
  activeInstance = prevActiveInstance
  // update __vue__ reference
  if (prevEl) {
    prevEl.__vue__ = null
  }
  if (vm.$el) {
    vm.$el.__vue__ = vm
  }
  // if parent is an HOC, update its $el as well
  if (vm.$vnode && vm.$parent && vm.$vnode === vm.$parent._vnode) {
    vm.$parent.$el = vm.$el
  }
  // updated hook is called by the scheduler to ensure that children are
  // updated in a parent's updated hook.
}
这里涉及到 VNode 和 DOM 节点的绑定__patch__,实现数据变化后触发的DOM更新
接下来,看看 vm.__patch__ 的源码实现
// src/core/vdom/patch.js

export function createPatchFunction (backend) {
  // ...
  // patch通过patchVnode来更新根节点
  function patchVnode (oldVnode, vnode, insertedVnodeQueue, removeOnly) {
    // ...

    if (isUndef(vnode.text)) {
      if (isDef(oldCh) && isDef(ch)) {
        // 1-2-3-6-2-9-2-2 通过updateChildren来更新子节点
        if (oldCh !== ch) updateChildren(elm, oldCh, ch, insertedVnodeQueue, removeOnly)
      } else if (isDef(ch)) {
        if (isDef(oldVnode.text)) nodeOps.setTextContent(elm, '')
        addVnodes(elm, null, ch, 0, ch.length - 1, insertedVnodeQueue)
      } else if (isDef(oldCh)) {
        removeVnodes(elm, oldCh, 0, oldCh.length - 1)
      } else if (isDef(oldVnode.text)) {
        nodeOps.setTextContent(elm, '')
      }
    } else if (oldVnode.text !== vnode.text) {
      nodeOps.setTextContent(elm, vnode.text)
    }
    if (hasData) {
      if (isDef(i = data.hook) && isDef(i = i.postpatch)) i(oldVnode, vnode)
    }
  }

  // ...

  return function patch (oldVnode, vnode, hydrating, removeOnly, parentElm, refElm) {
    if (!vnode) {
      if (oldVnode) invokeDestroyHook(oldVnode)
      return
    }

    let isInitialPatch = false
    const insertedVnodeQueue = []

    if (!oldVnode) {
      // empty mount (likely as component), create new root element
      isInitialPatch = true
      createElm(vnode, insertedVnodeQueue, parentElm, refElm)
    } else {
      const isRealElement = isDef(oldVnode.nodeType)
      if (!isRealElement && sameVnode(oldVnode, vnode)) {
        // patch existing root node
        // 1-2-3-6-2-9-2
        // diff并更新DOM。
        // 如果是update,则会调动patchVnode()
        patchVnode(oldVnode, vnode, insertedVnodeQueue, removeOnly)
      } else {
        // ...
      }
    }
    // 1-2-3-6-2-9-3 element insert到DOM中
    invokeInsertHook(vnode, insertedVnodeQueue, isInitialPatch)
    return vnode.elm
  }
}
小结一下
new Vue的过程主要涉及到三个对象:
vm、compiler、watcher
其中,
vm表示Vue的具体对象;compiler负责将template解析为AST render方法;watcher用于观察数据变化,以实现数据变化后进行re-render。
如下图所示,
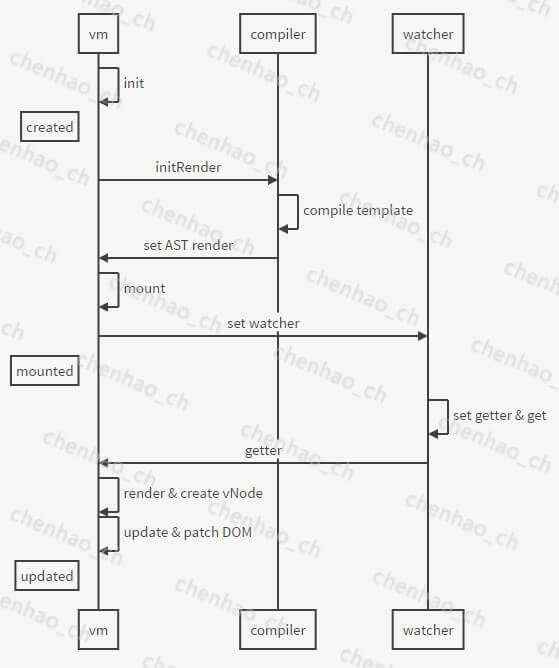
从template到DOM,有三个过程:
- template -> AST render(compiler解析template)
- AST render -> vNode (render方法运行)
- vNode -> DOM (vdom.patch)
Watcher —— 实现双向数据绑定
整个Watcher的过程可以分为三个过程:
- 对
state设置setter/getter - 对
vm设置好Watcher,添加好state触发setter时的执行方法 state变化触发执行
下面👇以 data 数据举例说明 Vue 2.0 如何实现双向数据绑定
回到文件 src/core/instance/init.js Vue.prototype._init 方法里的 initState(vm)
Vue 2.0 在 init 的过程中,执行 initState(vm) 初始化状态,会对Props, Data, Computed等属性添加 Setter/Getter
// src/core/instance/state.js

export function initState (vm: Component) {
  vm._watchers = []
  const opts = vm.$options
  if (opts.props) initProps(vm, opts.props)
  if (opts.methods) initMethods(vm, opts.methods)
  if (opts.data) {
    // 1-2-5-2 以 initData 举例说明 双向数据绑定
    initData(vm)
  } else {
    observe(vm._data = {}, true /* asRootData */)
  }
  if (opts.computed) initComputed(vm, opts.computed)
  if (opts.watch) initWatch(vm, opts.watch)
}

// ...

// 1-2-5-2-1 初始化 data
function initData (vm: Component) {
  let data = vm.$options.data
  data = vm._data = typeof data === 'function'
    ? data.call(vm)
    : data || {}

  // ...

  // proxy data on instance
  const keys = Object.keys(data)
  const props = vm.$options.props
  let i = keys.length
  while (i--) {
    if (props && hasOwn(props, keys[i])) {
      // ...
    } else if (!isReserved(keys[i])) {
      proxy(vm, `_data`, keys[i]) // 1-2-5-2-2 设置vm._data为代理
    }
  }
  // observe data
  // 1-2-5-2-3 通过调用observe方法,会对data添加好观察者
  // 在 src/core/observer/index.js 定义
  observe(data, true /* asRootData */)
}
看到 observe(data, true /* asRootData */),对 data 进行监听
// src/core/observer/index.js

export function observe (value: any, asRootData: ?boolean): Observer | void {
  if (!isObject(value)) {
    return
  }
  let ob: Observer | void
  if (hasOwn(value, '__ob__') && value.__ob__ instanceof Observer) {
    ob = value.__ob__
  } else if (
    observerState.shouldConvert &&
    !isServerRendering() &&
    (Array.isArray(value) || isPlainObject(value)) &&
    Object.isExtensible(value) &&
    !value._isVue
  ) {
    // 1-2-5-2-3-2 没有则新建 observer 实例
    ob = new Observer(value)
  }
  if (asRootData && ob) {
    ob.vmCount++
  }
  return ob
}

/**
 * Observer构造函数
 * Observer 会和被观察的对象绑定,
 * 并且将目标对象的健 key 转换成 包含getter/setters属性,
 * 就能够收集依赖 dep 同时分发 update
 */
export class Observer {
  value: any;
  dep: Dep;
  vmCount: number; // number of vms that has this object as root $data

  constructor (value: any) {
    this.value = value
    this.dep = new Dep()
    this.vmCount = 0
    def(value, '__ob__', this)
    if (Array.isArray(value)) {
      const augment = hasProto
        ? protoAugment
        : copyAugment
      augment(value, arrayMethods, arrayKeys)
      // 1-2-5-2-3-2-2
      // Array 则执行 observeArray to convert
      this.observeArray(value)
    } else {
      // 1-2-5-2-3-2-3
      // Array 则执行 walk to convert
      this.walk(value)
    }
  }

  /**
   * Walk through each property and convert them into
   * getter/setters. This method should only be called when
   * value type is Object.
   */
  walk (obj: Object) {
    const keys = Object.keys(obj)
    for (let i = 0; i < keys.length; i++) {
      // 1-2-5-2-3-2-3-2
      defineReactive(obj, keys[i], obj[keys[i]])
    }
  }

  // ...
}

// 1-2-5-2-3-2-3-2-1 给 Object 定义响应式属性
export function defineReactive (
  obj: Object,
  key: string,
  val: any,
  customSetter?: Function
) {
  const dep = new Dep()

  // ...

  let childOb = observe(val)
  // 1-2-5-2-3-2-3-2-2 定义属性
  // 可参考此方法给对象添加新属性
  Object.defineProperty(obj, key, {
    enumerable: true,
    configurable: true,
    get: function reactiveGetter () {
      const value = getter ? getter.call(obj) : val
      if (Dep.target) {
        dep.depend() // 1-2-5-2-3-2-3-2-3 处理好依赖watcher
        if (childOb) {
          childOb.dep.depend()
        }
        if (Array.isArray(value)) {
          dependArray(value)
        }
      }
      return value
    },
    set: function reactiveSetter (newVal) {
      const value = getter ? getter.call(obj) : val
      /* eslint-disable no-self-compare */
      if (newVal === value || (newVal !== newVal && value !== value)) {
        return
      }
      /* eslint-enable no-self-compare */
      if (process.env.NODE_ENV !== 'production' && customSetter) {
        customSetter()
      }
      if (setter) {
        setter.call(obj, newVal)
      } else {
        val = newVal
      }
      childOb = observe(newVal) // 1-2-5-2-3-2-3-2-4 对新数据重新observe
      dep.notify() // 1-2-5-2-3-2-3-2-5 通知到dep进行数据更新 在 src/core/observer/dep.js 定义
    }
  })
}
这里的重点是 defineProperty 方法,给对象添加新属性 getter/setter
看到 const dep = new Dep() 给 data 新建 Dep 依赖池,我们来看看 Dep 是什么东东
// src/core/observer/dep.js

/**
 * A dep is an observable that can have multiple
 * directives subscribing to it.
 */
/**
 * 一个 dep 是可以被多个指令订阅
 */
// 1-2-5-2-3-2-3-2-5-1 dep 相当于媒介 将观察者 和 目标数据关联起来
export default class Dep {
  static target: ?Watcher;
  id: number;
  subs: Array<Watcher>;

  constructor () {
    this.id = uid++
    this.subs = []
  }
  // 1-2-5-2-3-2-3-2-5-2 将 观察者(订阅者)们 收集起来
  addSub (sub: Watcher) {
    this.subs.push(sub)
  }

  removeSub (sub: Watcher) {
    remove(this.subs, sub)
  }
  // 1-2-5-2-3-2-3-2-5-3 给 Dep 的 观察者们 关联 媒介实例
  depend () {
    if (Dep.target) {
      Dep.target.addDep(this)
    }
  }
  // 1-2-5-2-3-2-3-2-5-4 更新 target watcher being evaluated
  notify () {
    // stabilize the subscriber list first
    const subs = this.subs.slice()
    for (let i = 0, l = subs.length; i < l; i++) {
      // 1-2-5-2-3-2-3-2-5-5 在 src/core/observer/watcher.js 中定义
      subs[i].update()
    }
  }
}
可以看到,这里 subs 数组收集的是 watcher 实例,而 subs[i].update() 实际执行的是 Watcher 的原型方法 update
先往前面回忆,回到代码 src/core/instance/lifecycle.js 处的关注点
vm._watcher = new Watcher(vm, updateComponent, noop)
那 Watcher 的构造函数在哪呢?请看下面👇
其中,this.getter 属性 会获取传入的 updateComponent 值
// src/core/observer/watcher.js

export default class Watcher {
  vm: Component;
  expression: string;
  cb: Function;
  id: number;
  deep: boolean;
  user: boolean;
  lazy: boolean;
  sync: boolean;
  dirty: boolean;
  active: boolean;
  deps: Array<Dep>;
  newDeps: Array<Dep>;
  depIds: Set;
  newDepIds: Set;
  getter: Function;
  value: any;

  constructor (
    vm: Component,
    expOrFn: string | Function,
    cb: Function,
    options?: Object
  ) {
    this.vm = vm
    vm._watchers.push(this)
    // ...
    if (typeof expOrFn === 'function') {
      // 在此赋值 回调到 src/core/instance/lifecycle.js 声明 new Watcher 的地方
      this.getter = expOrFn
    } else {
      this.getter = parsePath(expOrFn)
      if (!this.getter) {
        this.getter = function () {}
        // ...
      }
    }
    // Watcher会在构造完成后主动调用this.get()来触发this.getter()方法的运行,以达到更新DOM节点
    this.value = this.lazy
      ? undefined
      : this.get()
  }

  /**
   * Evaluate the getter, and re-collect dependencies.
   */
  get () {
    pushTarget(this)
    let value
    const vm = this.vm
    if (this.user) {
      try {
        value = this.getter.call(vm, vm)
      } catch (e) {
        handleError(e, vm, `getter for watcher "${this.expression}"`)
      }
    } else {
      // 通过调用 this.getter 更新 DOM
      // 在src/core/instance/lifecycle.js 声明 new Watcher 的地方 赋值了
      value = this.getter.call(vm, vm)
    }
    // ...
    popTarget()
    this.cleanupDeps()
    return value
  }

  /**
   * Add a dependency to this directive.
   */
  addDep (dep: Dep) {
    const id = dep.id
    if (!this.newDepIds.has(id)) {
      this.newDepIds.add(id)
      this.newDeps.push(dep)
      if (!this.depIds.has(id)) {
        dep.addSub(this)
      }
    }
  }

  /**
   * Clean up for dependency collection.
   */
  cleanupDeps () {
    // ...
  }

  /**
   * Subscriber interface.
   * Will be called when a dependency changes.
   */
  // Watcher 的 update 方法
  update () {
    /* istanbul ignore else */
    if (this.lazy) {
      this.dirty = true
    } else if (this.sync) {
      // 调用 run() 方法
      this.run()
    } else {
      // 通过nextTicker来执行run方法
      queueWatcher(this)
    }
  }

  /**
   * Scheduler job interface.
   * Will be called by the scheduler.
   */
  run () {
    if (this.active) {
      // 调用 get 方法 更新 DOM
      const value = this.get()
      if (
        value !== this.value ||
        // Deep watchers and watchers on Object/Arrays should fire even
        // when the value is the same, because the value may
        // have mutated.
        isObject(value) ||
        this.deep
      ) {
        // set new value
        const oldValue = this.value
        this.value = value
        if (this.user) {
          try {
            this.cb.call(this.vm, value, oldValue)
          } catch (e) {
            handleError(e, this.vm, `callback for watcher "${this.expression}"`)
          }
        } else {
          this.cb.call(this.vm, value, oldValue)
        }
      }
    }
  }

  // ...

  /**
   * Depend on all deps collected by this watcher.
   */
  depend () {
    let i = this.deps.length
    while (i--) {
      this.deps[i].depend()
    }
  }

  /**
   * Remove self from all dependencies' subscriber list.
   */
  teardown () {
    if (this.active) {
      // remove self from vm's watcher list
      // this is a somewhat expensive operation so we skip it
      // if the vm is being destroyed.
      if (!this.vm._isBeingDestroyed) {
        remove(this.vm._watchers, this)
      }
      let i = this.deps.length
      while (i--) {
        this.deps[i].removeSub(this)
      }
      this.active = false
    }
  }
}
执行 Watcher 的原型方法 update ,会调用
run() -> get() -> this.getter -> updateComponent -> vm._update(vm._render(), hydrating),最后更新 DOM
数据绑定关系图如下所示,
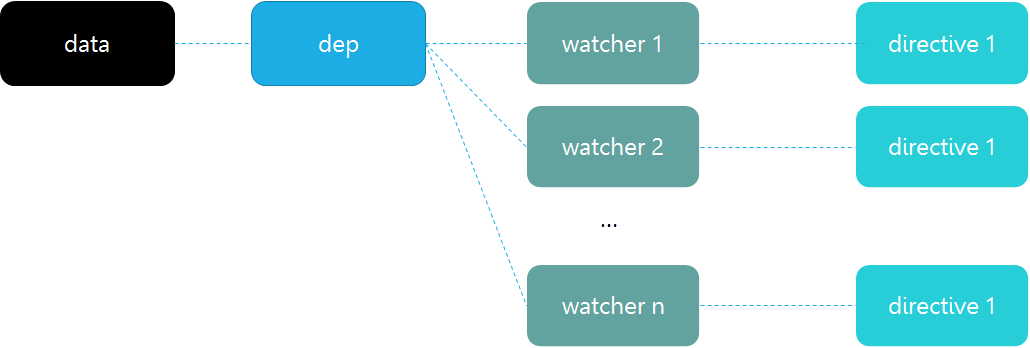
- 对数据读取时,如果当前有Watcher,那将该 Watcher 绑定到当前的数据上(dep.depend(),dep 关联当前数据和所有的 watcher 的依赖关系),是一个检查并记录依赖的过程。
- 而对数据赋值时,如果数据改变,则通知所有的 watcher(dep.notify())这样实现数据绑定
Watcher —— 总结
_init-> 对Data设置getter / setter:setter会调用dep.notify() ,以便数据变化时通知DOM进行更新。new Watcher时,配置更新DOM的方法 即Watcher.getter方法。- 当Data发生变化时,执行
dep.notify() -> watcher.getter()-> vm.render()、vm.update(),DOM更新
Vue2.0 基本运行机制总结为:
文本模板template,编译compile得到渲染函数(render),
该过程会识别并记录 Vue 的指令和其他语法,new Vue() 得到 vm 对象,
其中传入的数据会进行数据劫持处理,从而可以收集依赖,实现数据绑定
渲染过程是将所有数据交由渲染函数(render)进行调用,进而得到 vnode,应用 Virtual DOM 的机制实现初始渲染和更新
扩展阅读
独立构建 (vue/dist/vue.esm.js) 支线 即
src/entries/web-runtime-with-compiler.js中对Vue.prototype.$mount的继承定义
mount:挂载
在 entries/web-runtime-with-compiler.js 定义
// src/entries/web-runtime-with-compiler.js

// mount 临时存储Vue.prototype.$mount原值
const mount = Vue.prototype.$mount
Vue.prototype.$mount = function (
  el?: string | Element,
  hydrating?: boolean
): Component {
  el = el && query(el)
  // ...
  const options = this.$options
  // 1-2-3-2
  // resolve template/el and convert to render function
  // 如果没有render方法
  if (!options.render) {
    let template = options.template
    // ...
    if (template) { // 1-2-3-5 如果获取到了模板,则将模板转化为render方法
      // ...
      // 1-2-3-7 compileToFunctions方法会运行compile将template解析为多个render方法,也就是AST render
      // 定义在 src/platforms/web/compiler/index.js
      const { render, staticRenderFns } = compileToFunctions(template, {
        shouldDecodeNewlines,
        delimiters: options.delimiters
      }, this)
      options.render = render
      options.staticRenderFns = staticRenderFns

      // ...
    }
  }
  // 1-2-3-6 ./web-runtime.js
  // 会调用./web-runtime.js 中的Vue.prototype.$mount方法
  return mount.call(this, el, hydrating)
}
如果有render方法,直接运行mount;
Vue 2.0中的模板有三种引用写法:el, template, render(JSX)。其中的优先级是 render > template > el
重点关注两个地方:
mount.call(this, el, hydrating)调用·./web-runtime.js文件 中的Vue.prototype.$mount方法compileToFunctions方法 生成的 AST render 方法
知识点:AST指 抽象语法树(Abstract Syntax Tree)
render:渲染
// src/compiler/index.js

function compileToFunctions (
  template: string,
  options?: CompilerOptions,
  vm?: Component
): CompiledFunctionResult {
  options = options || {}

  //...
  // check cache

  // 1-2-3-7-1-2 最终由compile方法 生成render
  const compiled = compile(template, options)

  //...
}

// 1-2-3-7-1-2-1 compile方法就是将template以AST的方式进行解析,并转化为render方法进行返回
function compile (
  template: string,
  options?: CompilerOptions
): CompiledResult {
  // ...
  // 1-2-3-7-1-2-2 核心
  const compiled = baseCompile(template, finalOptions)
  if (process.env.NODE_ENV !== 'production') {
    errors.push.apply(errors, detectErrors(compiled.ast))
  }
  compiled.errors = errors
  compiled.tips = tips
  return compiled
}

function baseCompile (
  template: string,
  options: CompilerOptions
): CompiledResult {
  // 1-2-3-7-1-2-2-1 核心代码 attrsList 在 ./parser/index.js定义
  const ast = parse(template.trim(), options) // 解析template为AST 抽象语法树 将最大静态子树提取出来
  // 1-2-3-7-1-2-2-2 在 ./optimizer.js 中定义
  optimize(ast, options) // 提取static tree
  // 1-2-3-7-1-2-2-3
  const code = generate(ast, options) // 生成render 方法
  return {
    ast,
    render: code.render, // 1-2-3-7-1-2-2-4 编译得到 render 其实是代码文本,通过 new Function(code) 的方式转为函数
    staticRenderFns: code.staticRenderFns
  }
}
方法调用过程为: createCompiler -> compileToFunctions -> compile -> baseCompile
核心是 baseCompile 生成 render 方法,其中涉及到 解析template为AST 抽象语法树,最大静态子树的提取
有兴趣可自行分析 ./parser/index.js 代码,此处不展开
技术栈学习资料
- MVVM框架: Vue 2.0
- 源码:es6
- 代码风格检查:eslint
- 构建工具:webpack2.0
- 前端路由:vue-router
- 状态管理:vuex
- 服务端通讯:vue-resource
- vue UI组件库:vux
- 基于vue2.0实现的多页面项目雏形:sgoddon-vux